Step-by-Step Guide – How to MBuild Your Own Diy Humidor and Store Cigars Properly
Are you a cigar aficionado looking to take your cigar collection to the next level? Building your own humidor is a rewarding and worthwhile project that allows you to showcase and preserve your cigars in style. Whether you’re a seasoned woodworker or a DIY enthusiast, this step-by-step guide will walk you through the process of creating your very own humidor.
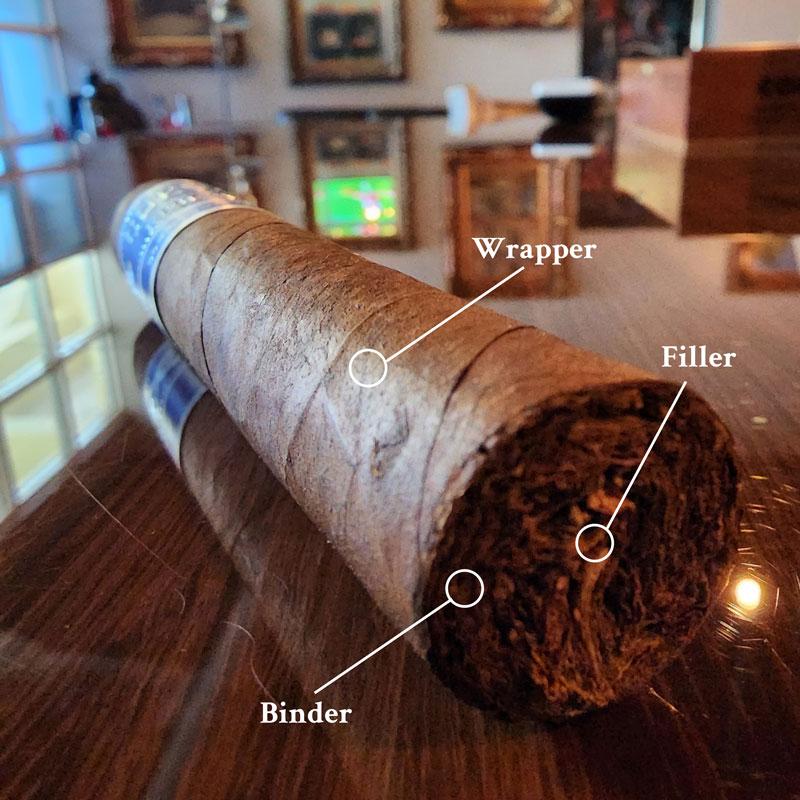
The first step in building a humidor is selecting the right materials. A humidor needs to provide a stable and controlled environment for your cigars, so choosing quality wood is essential. Spanish cedar is the most popular choice due to its ability to absorb and regulate moisture. It also adds a pleasant aroma to your humidor, enhancing the overall experience. Additionally, you’ll need other materials such as a hygrometer, a humidification device, and brass hinges and hardware to complete your humidor.
Once you have gathered all the necessary materials, it’s time to begin construction. Start by measuring and cutting the wood to the desired dimensions for your humidor. Remember to account for the space needed for the hygrometer and humidification device. Then, assemble the pieces using wood glue and screws, ensuring a tight and secure fit. Next, add the Spanish cedar lining to the interior of the humidor, paying attention to detail to create a smooth and even surface.
After the main structure is complete, it’s time to focus on the final touches. Sand the exterior of the humidor to achieve a smooth finish, and apply a sealant or varnish to protect the wood and enhance its natural beauty. Install the brass hinges and hardware, ensuring they are sturdy and functional. Finally, attach the hygrometer and humidification device, making sure they are well-positioned and properly calibrated.
Once your humidor is fully built, it’s important to season it before introducing your cigars. This process involves gradually increasing the humidity levels inside the humidor to reach the optimal range for cigar storage. Allow the humidor to sit for a few days to ensure it is properly seasoned and ready to house your valuable cigar collection. Now, sit back, relax, and enjoy the fruits of your labor as you indulge in perfectly preserved cigars from your homemade humidor.
Choose Your Materials
When it comes to building your own humidor, it’s important to choose the right materials that will provide a proper seal and maintain the ideal conditions for storing cigars. Here are some key materials to consider:
| Material | Description |
|---|---|
| Wood | Wood is the most common material used for humidors. It’s important to choose a wood that is resistant to warping, such as Spanish cedar or mahogany. These types of wood also have natural oils that help regulate humidity and deter pests. |
| Lining | The interior of the humidor should be lined with a material that retains moisture, such as Spanish cedar. This helps to maintain the proper humidity levels inside the humidor and prevent the cigars from drying out. |
| Hinges and Hardware | Choose high-quality hinges and hardware that will provide a tight seal when the humidor is closed. Brass or stainless steel hinges are commonly used and are durable. |
| Humidification System | Include a reliable humidification system that will help to regulate the humidity inside the humidor. This can be a passive system, such as a humidification device or humidification beads, or an active system, such as an electronic humidifier. |
| Sealant | Use an appropriate sealant, such as a food-grade silicone, to create a tight seal along the edges of the humidor. This will help to prevent any air leaks and maintain consistent humidity levels. |
By choosing the right materials, you can ensure that your homemade humidor will provide a safe and optimal environment for storing your cigars.
Measure and Cut the Wood
Before you can start building your own humidor, you’ll need to measure and cut the wood for the various components of the box. This step is crucial, as accurate measurements will ensure that your humidor comes together properly and fits together snugly.
Gather Your Materials
First, gather all the necessary materials for this step. You will need a measuring tape, a pencil, a straight edge, and the wood that you have chosen for your humidor. Make sure that your wood is of high quality and suitable for humid environments.
Measure and Mark
Using the measuring tape, measure the dimensions for the sides, top, and bottom of your humidor. Make sure to account for any extra space needed for hinges, latches, or other hardware. Mark the measurements directly onto the wood with a pencil, using the straight edge to ensure straight lines.
Tip: Double-check your measurements before cutting the wood to ensure accuracy. It’s always better to measure twice and cut once!
Once you have marked all the necessary measurements, use a saw to carefully cut the wood according to your markings. Take your time and make precise cuts to achieve clean and even edges. Remember to wear safety glasses and exercise caution when using power tools.
Pro tip: If you don’t have access to power tools, many local hardware stores offer wood-cutting services. Simply bring your marked measurements to the store, and they can cut the wood for you.
After cutting your wood, take a moment to inspect the pieces for any imperfections or rough edges. Sand any rough areas to ensure a smooth finish, as these imperfections can affect the final look and feel of your humidor.
Congratulations! You have now measured and cut the wood for your humidor. Next, it’s time to assemble the pieces and continue building your own humidor.
Assemble the Box
Now that all the necessary parts are prepared, it’s time to assemble the box for your humidor. Follow these steps to ensure a sturdy and well-constructed humidor:
Step 1: Position the Front and Back Panels
Start by positioning the front and back panels of the box. Apply a thin layer of wood glue to the edges of the front panel, then attach it to the corresponding edges of the bottom panel. Make sure the edges are aligned properly. Repeat this process with the back panel.
Step 2: Attach the Sides
Next, attach the side panels to the front, back, and bottom panels. Apply wood glue to the edges of the side panels and attach them to the corresponding edges of the already assembled pieces. Use clamps to hold everything together securely. Allow the glue to dry according to the manufacturer’s instructions.
Step 3: Install the Lid
After the glue has dried, it’s time to install the lid. Apply wood glue to the edges of the box and attach the lid panel. Use clamps to hold it in place and allow the glue to dry completely.
Step 4: Sand and Finish
Once the glue has fully dried, sand the entire exterior of the box to smooth out any rough edges or imperfections. Apply a finish of your choice, such as varnish or lacquer, following the manufacturer’s instructions. This will protect the wood and enhance its appearance.
Your humidor box is now assembled and ready to be equipped with the necessary interior components.
Install the Hinges and Lock
Once you have completed the construction of the main body of your humidor, it is time to install the hinges and lock. The hinges will allow you to easily open and close the lid of the humidor, while the lock will provide added security for your precious cigars.
Materials Needed
Before you begin, gather the following materials:
| – Hinges and screws |
| – Lock and key |
| – Screwdriver |
| – Measuring tape |
Step 1: Position the Hinges
Start by determining the ideal position for the hinges on the back of the humidor. Measure and mark the desired location for the hinges, taking into consideration the size and weight of the lid. It is recommended to place the hinges equidistant from the edges of the humidor to ensure stability and balance.
Step 2: Attach the Hinges
Using a screwdriver, attach the hinges to the back of the humidor using the provided screws. Make sure the hinges are securely screwed in place, as they will bear the weight of the lid when it is opened and closed.
Step 3: Install the Lock
Measure and mark the desired position for the lock on the front of the humidor, opposite the hinges. Ensure that the lock is centered and aligned with the hinges for proper functionality. Use a screwdriver to attach the lock securely to the humidor, following the manufacturer’s instructions.
Finally, test the hinges and lock to ensure they are functioning properly. Open and close the lid multiple times to make sure it is smooth and secure. Try locking and unlocking the lock to ensure it is working as intended. Adjust and tighten any screws if necessary.
Congratulations! You have successfully installed the hinges and lock on your humidor. With this important step completed, you are one step closer to enjoying the perfect environment to store and age your cigars.
Seal the Interior
Once you have finished the construction of your humidor, it is important to properly seal the interior to ensure a consistent and ideal humidity level for your cigars.
Begin by thoroughly cleaning the interior of the humidor with a damp cloth to remove any dust or debris. Pay special attention to the corners and seams where leaks can occur.
Next, apply a thin layer of distilled water to the entire interior of the humidor using a clean cloth. Be careful not to oversaturate the wood, as this can lead to warping or mold growth.
After applying the water, allow the interior of the humidor to dry completely before moving on to the next step. This can take several hours or even overnight, depending on the climate and humidity level in your area.
Once the interior is dry, it is time to apply the sealant. There are several options available, including polyurethane, lacquer, or shellac. Choose a sealant that is specifically designed for use with wooden surfaces.
Apply the sealant according to the manufacturer’s instructions, ensuring that you cover the entire interior surface of the humidor. Pay extra attention to the seams and corners to create a tight seal.
Allow the sealant to dry completely before adding any cigars to the humidor. This may take several days, so be patient and avoid rushing the process.
Once the sealant is dry, you can start seasoning your humidor by following the instructions provided with your humidification device. This will ensure that your humidor is ready to properly store and age your cigars.
Remember to regularly monitor the humidity level inside your humidor and make any necessary adjustments to maintain the ideal range for cigar storage. A properly sealed and seasoned humidor will provide you with years of enjoyment and perfectly preserved cigars.
Apply a Finish
Once you have completed the construction of your humidor, it’s time to apply a finish to protect the wood and give it a polished look. There are several options for finishing your humidor, including stains, varnishes, and oils. Here’s a step-by-step guide on how to apply a finish to your humidor:
1. Sand the Surface
Before applying any finish, it’s important to sand the surface of your humidor to ensure a smooth and even finish. Start with a coarse sandpaper to remove any rough edges or imperfections, and then gradually move to finer grits for a polished surface.
2. Choose Your Finish
There are different types of finishes available, each with its own advantages and disadvantages. Stains can enhance the natural color of the wood while varnishes provide a glossy finish. Oils, such as tung oil or linseed oil, can penetrate the wood and protect it from moisture. Consider the look you want to achieve and the level of protection needed before choosing your finish.
| Finish Type | Advantages | Disadvantages |
|---|---|---|
| Stain | Enhances wood color | May require multiple coats |
| Varnish | Provides glossy finish | Requires proper ventilation |
| Oil | Penetrates wood for protection | May require regular reapplication |
3. Apply the Finish
Follow the manufacturer’s instructions for the specific finish you have chosen. Use a brush, cloth, or spray gun to apply an even coat of the finish, working with the grain of the wood. Allow the finish to dry completely before applying additional coats.
Remember to work in a well-ventilated area and wear protective gloves and a mask when working with finishes, as some can be toxic. Also, consider using a finish that is safe for use with cigars, as some finishes can emit odors or flavors that may affect the taste of your cigars.
Applying a finish is the final step in building your own humidor. Once the finish has dried, you can assemble the hardware, such as hinges and hygrometer, and season your humidor before placing your cigars inside. With proper care, your handmade humidor will provide a beautiful and functional storage solution for your cigars for years to come.
Add the Hygrometer and Diy Humidifier Cigar
To ensure proper humidity levels in your humidor, it’s important to add a hygrometer and a humidifier.
Step 1: Start by choosing a high-quality digital hygrometer. This device will measure the humidity inside your humidor and display it on a screen. Look for a hygrometer that has a reputation for accuracy and reliability.
Step 2: Once you have a hygrometer, you need to decide where to place it inside your humidor. The best location is somewhere near the middle of the humidor, away from any direct contact with the humidifier or cigars. This will give you the most accurate reading of the overall humidity.
Step 3: Now it’s time to add the humidifier. There are several types of humidifiers available, including gel-based, crystal-based, and electronic. Choose the one that fits best in your humidor and has a good reputation for maintaining consistent humidity levels.
Step 4: Place the humidifier in a location that allows for even distribution of humidity throughout the humidor. It should be away from the hygrometer, but still in close proximity to the cigars. Follow the manufacturer’s instructions for properly maintaining and refilling the humidifier.
Step 5: Once both the hygrometer and humidifier are in place, give them some time to stabilize and adjust to the environment inside the humidor. This process may take a few days, so be patient. During this time, monitor the humidity levels regularly using the hygrometer and make any necessary adjustments to the humidifier to achieve the desired humidity range.
Remember, maintaining the proper humidity level is crucial for preserving the quality of your cigars. Keep an eye on the hygrometer and humidifier and make any necessary changes to ensure your cigars stay in optimal condition.
Season the Diy Humidors Cabinet
As a crucial step in preparing your humidor for use, you need to season it properly. Seasoning the humidor involves adding moisture to the cedar lining. This process is essential for creating a stable and ideal environment to store your cigars.
Why is seasoning necessary?
When you purchase a new humidor or haven’t used your humidor for some time, the cedar lining may be dry. Dry wood can absorb humidity from your cigars, resulting in them drying out and losing their flavor. Seasoning the humidor replenishes the moisture in the wood and prevents it from robbing moisture from the cigars.
How to season your humidor
To season your humidor, follow these simple steps:
- Thoroughly clean the humidor with a damp cloth. Ensure there are no dust or debris inside.
- Wet a clean sponge or cloth with distilled water or a humidification solution specifically made for seasoning humidors.
- Gently wipe down the cedar lining, including the walls, lid, and tray.
- Put a small container filled with distilled water or a humidity bead pack inside the humidor.
- Close the humidor and let it sit undisturbed for about 24 to 48 hours.
- Check the humidity levels with a digital hygrometer. The ideal humidity range should be between 65% and 70%.
- If the humidity levels are too low, repeat the process until the desired humidity is reached.
Remember, the seasoning process should be done before storing any cigars in the humidor. This ensures that the cedar lining is properly moisturized and ready to maintain a stable humidity level.
Q&A:, How to make a humidor
How can you make your own DIY humidor for storing cigars?
You can make a DIY humidor using a wooden box or container, lining it with Spanish cedar and adding a humidification device to regulate the humidity levels.
What woodworking skills are necessary to build a DIY humidor?
Basic woodworking skills such as measuring, cutting, and sanding are needed to build a DIY humidor, along with the ability to use a nail gun or wood glue for assembly.
How can you ensure that your DIY humidor is properly humidified?
To ensure proper humidification, you can use a digital hygrometer to monitor humidity levels inside the humidor and adjust as needed using a humidification device.
What type of wood is best for making a DIY humidor?
Spanish cedar is the preferred wood for making a DIY humidor due to its natural ability to absorb and retain moisture, which helps regulate humidity levels inside the humidor.
What are some tips for maintaining humidity in a DIY humidor?
To maintain humidity in a DIY humidor, regularly check the hygrometer and add distilled water to the humidification device as needed to keep humidity levels between 65-70%.
How can you ensure that your DIY humidor provides a proper seal?
To ensure a proper seal, use weatherstripping or a similar material to create a tight seal around the lid of the humidor, preventing moisture from escaping.
What are the benefits of making your own DIY humidor?
Making your own DIY humidor allows you to customize the size and design to fit your needs, as well as save money compared to purchasing a pre-made humidor.
How can you add a personal touch to your DIY humidor?
You can add a personal touch to your DIY humidor by engraving or painting the exterior, or adding a custom humidification device with your initials or logo.
What are some common mistakes to avoid when making a DIY humidor?
Common mistakes to avoid when making a DIY humidor include using improper materials, not properly sealing the humidor, and not maintaining proper humidity levels.
How can you enhance the appearance of your DIY humidor?
You can enhance the appearance of your DIY humidor by adding decorative hardware such as hinges and handles, or by applying a wood finish to give it a polished look.