Step-by-Step Guide – How to M Build Your Own Cigar Box Guitar at Home
Have you ever wanted to play a unique and vintage-sounding instrument? Look no further than a cigar box guitar! Combining creativity and music, making your own cigar box guitar can be a fun and rewarding project that anyone can tackle. Whether you’re a seasoned musician or just starting out, this step-by-step guide will walk you through the process of creating your very own cigar box guitar right at home.
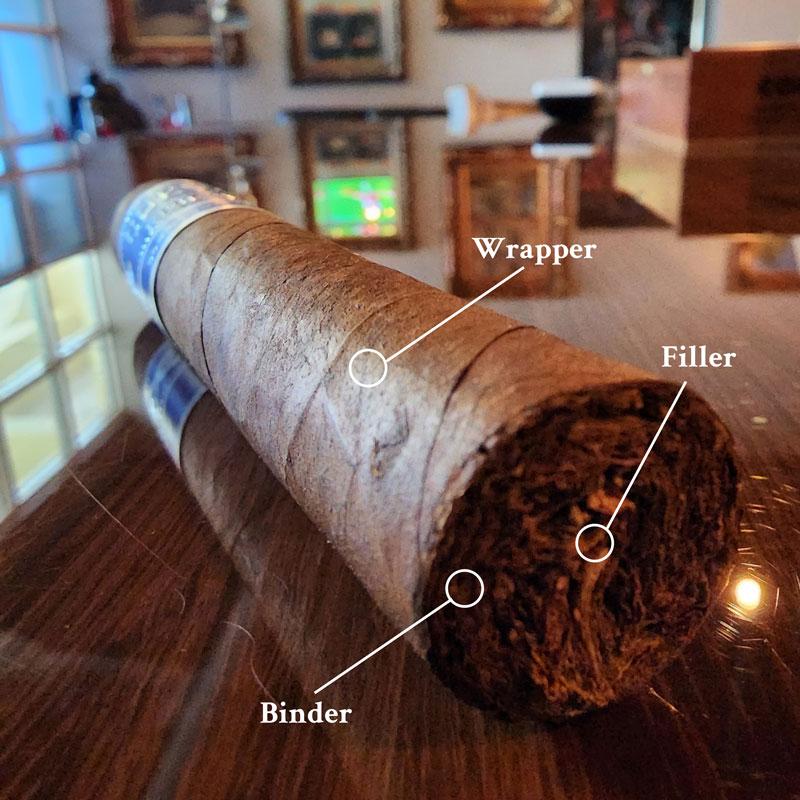
The cigar box guitar has a rich history dating back to the 1800s when resourceful musicians would make these instruments out of a cigar box, a stick, and a few strings. Today, it has evolved into a popular DIY project loved by musicians and hobbyists alike. Not only does it offer a unique sound and look, but it also provides a fantastic opportunity for customization and personalization.
To get started, you’ll need some basic tools and materials such as a cigar box, a wooden neck, strings, tuners, and various hand tools. Don’t worry if you’re not a woodworking expert – this guide is designed to be beginner-friendly and will guide you through each step with clear instructions and helpful tips along the way. By the end of the project, you’ll have a fully functional homemade cigar box guitar ready to play.
Whether you’re looking to expand your musical repertoire, unleash your DIY skills, or simply enjoy the satisfaction of playing an instrument you built yourself, making a cigar box guitar is an excellent choice. So, grab your tools, unleash your creativity, and let’s get started on this exciting musical adventure!
Gather Necessary Materials and Tools
Before you can start building your own cigar box guitar, you will need to gather the necessary materials and tools. Here is a list of what you will need:
Materials:
- A wooden cigar box
- A hardwood neck
- Guitar strings
- A bridge
- A nut
- Tuning pegs
- Fret wire
- A tailpiece
- A truss rod
- Wood glue
- Screws
Tools:
- A saw
- A drill
- A chisel
- A file
- Sandpaper
- A soldering iron
- A ruler
- A pencil
- Clamps
- A screwdriver
Make sure to gather all the materials and tools before you begin the construction process. This will save you time and make the building process more efficient.
Prepare the Cigar Box
Before you start building your cigar box guitar, you need to prepare the cigar box itself. Here’s how:
1. Choose a suitable cigar box: Look for a cigar box that is sturdy and in good condition. Make sure it is large enough to accommodate the neck and strings of the guitar. You can find cigar boxes at local tobacco shops or online.
2. Remove any labels or stickers: Use a damp cloth or sponge to gently remove any labels or stickers from the box. It’s important to have a clean surface for attaching the neck and other components.
3. Sand the box: Use sandpaper to sand the entire surface of the cigar box. This will help to remove any rough edges or imperfections and create a smooth surface for painting or staining.
4. Decorate the box (optional): If desired, you can decorate the cigar box to give it a personalized touch. You can paint it, stain it, or apply decals or stickers. Get creative and make it your own!
5. Seal the box: To protect the box and enhance its durability, apply a coat of sealant or varnish. This will also give the box a glossy finish. Allow it to dry completely before moving on to the next step.
By following these steps, you will have a prepared cigar box ready for the next phase of building your cigar box guitar.
Create the Neck
Once you have gathered all the necessary materials and tools, it’s time to start creating the neck of your cigar box guitar. The neck is an essential component as it holds the strings and allows you to play the instrument.
Step 1: Measure and Cut the Neck
Begin by measuring and cutting a piece of wood for the neck. The length will depend on your desired scale length, but a typical neck length for a cigar box guitar is around 25 inches. Ensure that the width and thickness of the wood are suitable for your hand and playing style.
Step 2: Shape the Neck
Next, use a saw or rasp to shape the neck. You can create a curved or flat profile, depending on your preference. Smooth out any rough edges or sharp corners to ensure a comfortable playing experience.
Tip: You can consider adding a scarf joint to the neck to increase its strength and stability.
Step 3: Drill the Holes
Drill holes in the neck for the tuners. Measure the appropriate spacing between each hole, typically around 1 inch apart. Use a drill bit that matches the size of your tuning machine’s shaft. Make sure the holes are straight and aligned to ensure smooth string installation and tuning.
Step 4: Attach the Fretboard
Attach a fretboard to the top surface of the neck. You can use a premade fretboard or create your own by cutting a thin piece of wood to the desired length and width. Glue the fretboard onto the neck and secure it with clamps until the adhesive dries.
Note: Fretboards typically have markings to indicate where each fret should be placed. You can use a ruler or a template to accurately position the frets.
With these steps completed, you’ve successfully created the neck of your cigar box guitar. The next step is to assemble the different parts together to complete your homemade instrument.
Attach the Neck to the Cigar Box
Now that you have prepared your cigar box and the neck of your guitar, it’s time to attach the neck to the box. Follow these steps:
- Place the cigar box horizontally on a flat surface, with the opening facing up.
- Align the neck with the edge of the box where you want it to be attached.
- Hold the neck in place and mark the positions where you will drill the holes.
- Using a drill with an appropriate size bit, carefully drill holes through the marked positions on the box.
- Place the neck back into position and secure it to the box using screws or bolts.
- Tighten the screws or bolts to ensure a secure fit, but be careful not to over-tighten and crack the box.
Once the neck is securely attached to the cigar box, give it a gentle tug to make sure it’s properly affixed. If it feels loose, tighten the screws or bolts further.
Now that you have successfully attached the neck to the cigar box, you can move on to the next step in building your homemade cigar box guitar.
Install the Fretboard
Once you have attached the neck to the body of the cigar box guitar, it’s time to install the fretboard. The fretboard is where the player will press down on the strings to create different notes and pitches.
Here are the steps to install the fretboard:
- Measure the length of the neck to determine the exact placement of the fretboard.
- Cut the fretboard to the appropriate length, making sure it is wide enough to accommodate the strings.
- Apply a thin layer of wood glue to the back of the fretboard.
- Carefully position the fretboard onto the neck, ensuring that it is centered and aligned correctly with the nut.
- Press down firmly on the fretboard to ensure proper adhesion.
- Use clamps or heavy objects to hold the fretboard in place while the glue dries completely.
- After the glue has dried, use a saw or file to cut slots for the frets along the length of the fretboard.
Make sure to take your time during this process to ensure the fretboard is securely and accurately installed. The quality of your fretboard installation will greatly impact the playability and sound of your cigar box guitar.
In the next step, we will be installing the frets onto the fretboard, so stay tuned!
Add the Tuning Pegs and Strings
Once the neck is securely glued to the body of the cigar box guitar, it is time to add the tuning pegs and strings. The tuning pegs are an essential part of the guitar as they allow you to adjust the tension of the strings and tune the instrument to the desired pitch.
Start by drilling small pilot holes on the headstock of the neck where you want to attach the tuning pegs. The number of tuning pegs depends on the design of your cigar box guitar, but typically there are six pegs, one for each string.
Once the pilot holes are drilled, insert the tuning pegs into the holes and screw them in tightly. Make sure they are firmly attached to the headstock and facing upwards.
Next, it is time to add the strings to the guitar. Begin by attaching one end of the string to the tailpiece at the bottom of the cigar box, near the bridge. The tailpiece is usually a metal or wooden piece that anchors the strings to the body of the guitar.
Thread the other end of the string through the hole in the tuning peg corresponding to that string. Pull the string tight and wind it around the peg, turning the peg clockwise until the string is securely attached and has the desired tension. Repeat this process for each string.
Once all the strings are attached and tuned, it is a good idea to play each string individually and make any necessary adjustments to ensure they are in tune. You can use an electronic tuner or a smartphone app to help you with this.
Congratulations! You have successfully added the tuning pegs and strings to your homemade cigar box guitar. Now you are ready to start playing and enjoying the unique sound of your creation.
Install the Bridge
Once the neck and fretboard are securely attached to the cigar box, it’s time to install the bridge. The bridge is a small piece of hardware that helps support the strings and transfer their vibrations to the body of the guitar.
To install the bridge, follow these steps:
- Measure the distance from the nut to the 12th fret on the fretboard. This will help you position the bridge correctly.
- Mark the midpoint between the 12th fret and the soundhole on the cigar box.
- Using a ruler or measuring tape, measure the distance from the nut to the marked midpoint on the cigar box.
- Using a pencil, make a small mark on the cigar box at the measured distance.
- Place the bridge on the marked spot and align it with the strings. The bridge should be centered between the edges of the cigar box.
- Once the bridge is positioned correctly, use a screwdriver or drill to attach it to the cigar box. Make sure the screws are secure but not too tight.
Installing the bridge is an important step in building a cigar box guitar, as it helps ensure the strings have the right amount of tension and the instrument produces clear and crisp sound. Once the bridge is securely installed, you can move on to the next step of stringing and tuning the guitar.
Fine-tuning and Testing the Guitar
Once you have completed building your cigar box guitar, it’s time to fine-tune and test it to ensure it produces the desired sound.
First, check the tuning of each string. Use a tuner or a piano as a reference to tune the strings to the correct pitch.
Next, check the intonation of the guitar. This refers to the accuracy of the pitch as you move up and down the neck. To test the intonation, play each string open and then at the 12th fret. The pitch should be the same for both notes. If there is a difference in pitch, you may need to adjust the placement of the bridge.
After tuning and checking the intonation, it’s time to play some chords and test the sound of the guitar. Strum different chords and listen carefully for any buzzes or dead notes. If you encounter any issues, inspect the instrument for any loose or improperly secured parts. Tighten or adjust as necessary.
Another important aspect to consider is the action of the strings. This refers to the height of the strings above the fretboard. If the action is too high, it may be difficult to play. If it’s too low, it can cause buzzing. Adjust the truss rod or the saddle height to achieve the optimal action for your playing style.
Lastly, consider the overall playability and comfort of the guitar. Is it easy to hold and play? Are the frets smooth and level? Make any necessary adjustments to ensure a comfortable playing experience.
| Step | Action |
|---|---|
| 1 | Tune the strings using a tuner or a piano. |
| 2 | Check the intonation by playing open strings and then at the 12th fret. Adjust the bridge if needed. |
| 3 | Strum different chords and listen for any buzzing or dead notes. Tighten or adjust any loose parts. |
| 4 | Adjust the action of the strings by adjusting the truss rod or the saddle height. |
| 5 | Ensure the overall playability and comfort of the guitar by making necessary adjustments. |
Q&A: How to make a cigar box guitar
Where do I put the sound hole on a cigar box guitar?
The sound hole is typically placed on the top of the cigar box, near the neck. This allows the sound waves to resonate and project out of the guitar.
What is the box lid on a cigar box guitar used for?
The box lid can be used as the top or bottom of the guitar. If you use it as the top, you will need to cut a sound hole in it. If you use it as the bottom, you can leave it solid.
Where do I put the strings on a 3-string cigar box guitar?
The strings are typically attached to the tuning pegs on the headstock and to the bridge on the tail end of the guitar.
What is the difference between an acoustic guitar and a cigar box guitar?
An acoustic guitar is a type of guitar that has a hollow body that resonates to produce sound. A cigar box guitar is a type of homemade guitar that is made from a cigar box. It is typically smaller and has a simpler construction than an acoustic guitar.
What is a coping saw used for in cigar box guitar building?
A coping saw is a type of saw that is used to cut curves. It is often used to cut the sound hole in a cigar box guitar.
What is a piezo pickup?
A piezo pickup is a type of pickup that converts vibrations into an electrical signal. It is often used in cigar box guitars to amplify the sound.
What is the tail end of a cigar box guitar?
The tail end of a cigar box guitar is the end of the guitar where the strings are attached.
What is the neck of a cigar box guitar made of?
The neck of a cigar box guitar is typically made of wood. It can be made from a single piece of wood or from two pieces of wood that are glued together.
What is the fretboard of a cigar box guitar made of?
The fretboard of a cigar box guitar is typically made of wood. It has frets that are used to mark the different notes.
What is the scale length of a 3-string cigar box guitar?
The scale length of a 3-string cigar box guitar is typically 25 inches. This is the distance from the nut to the bridge.
What type of strings are used on a 3-string cigar box guitar?
The most common type of strings used on a 3-string cigar box guitar are .013, .017, and .
Can a simple cigar box guitar be “official”?
There’s no official certification for homemade instruments like cigar box guitars. However, your creation can be as functional and enjoyable as any standard guitar if built with care and attention to detail.
Do I need to join Cigar Box Nation to build one?
Joining Cigar Box Nation (CigarBoxNation.com) is a great way to learn from experienced builders and access resources, but it’s not necessary. Many online tutorials and guides can help you get started.
What about the neck attachment (end, top, bottom)?
The neck typically attaches to the top of the box. Ensure it aligns with the center of the box and the bottom edge of the headstock is flush with the top edge of the box.
How do I make the neck fit the body like a standard guitar?
Cigar box guitars often have simpler neck attachments compared to standard guitars. Focus on a sturdy and aligned connection using wood glue and screws or bolts. Aim for a comfortable playing angle for the neck.
What’s the back of the guitar (inside/outside)?
The back is usually the bottom of the box. You can leave it as is or decorate it for aesthetics. Some builders add bracing inside the box for structural support.
Do I need a hole in the box (besides the sound hole)?
Not necessarily. Depending on your design, you might need additional holes for the neck mounting screws/bolts, endpin (tail attachment), and electronics (if using a pickup).
Where can I find CBG parts (tuning pegs, etc.)?
Online guitar parts suppliers and specialized cigar box guitar websites like CBGitty (CBGitty.com) offer various parts and kits.
How do I mark the neck joint (where the neck meets the body)?
Carefully measure and mark the top of the box where the neck will be positioned. Ensure it’s centered and aligns with the desired playing angle. You can use a straightedge and pencil for accurate marking.
Can I remove the neck if I mess up and build another guitar?
Yes, but be mindful of any damage caused by removing screws/bolts or glue. You might need to prepare a new neck or repair the box before building another guitar.
Do I need special tuning pegs for a cigar box guitar?
Standard guitar tuning pegs work well for most builds. Choose pegs that fit the headstock thickness and accommodate your desired string gauge.
Is building a cigar box guitar more about the art or the playing?
It’s both! The building process allows for creativity and personalization, while the playing aspect lets you enjoy the instrument you created.